Riscy
Analysis and solution of picoCTF’s RE Hard question Riscy
First contact
First thing was to run file on the provided binary, which yields the following:
|
|
As expected based on the title, RISC-V. Just a few points of interest, RVC means we can expect to see compressed instructions, which are the same but smaller. e.g. li can become c.li, using half the size for the instruction at the cost of supporting smaller values to load. It’s statically linked, so no external libraries needed, but also that means that’s not a method to attack it. Finally, it’s stripped, which isn’t the end of the world, an ELF will always give us entry.
I ran readelf -a on it next, nothing too exciting file didn’t already get.
Finally a cursory checksec shows the following:
|
|
Static analysis with Ghidra
ecall woes
A common problem I encountered was that Ghidra doesn’t play nice with ecall, which is how RISC-V does syscalls and hands control over to the OS/kernel for a second. What this means is we get a lot of code like this:
li      a7, 0x40
li      a0, 0x1
auipc   a1, 0x0
addi    a1, a1, 0x123
li      a2, 0x20
ecall
Except that Ghidra’s decompiler will only display ecall().
Going over this, we have a7 = 0x40 indicating the syscall for “write”, a0 = 0x1, indicating that we’re writing to STDOUT, a1 = pc + 0x123, which is the relative address of the string we’re printing, a2 = 0x20, a length, and finally the ecall to tie it all together. In C, this would be something like print("Some string");.
Overall Ghidra decompiled RISC-V somewhat poorly. Disassembly however was good. The analysis process was about 50/50 analyzing disassembled code vs decompiled code.
Redefine function signatures first
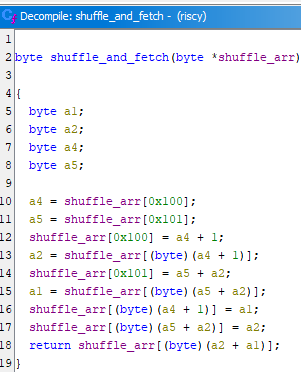
A lesson I learned from this is that decompiling works much better when the function signatures are more correct. I got most of the way through shuffle_and_fetch, then modified the function signature, and Ghidra automatically re-decompiled the function much more accurately.

The new function signature:

Function list

There are only 4 functions to analyze in the binary, excluding local jumps and labels.
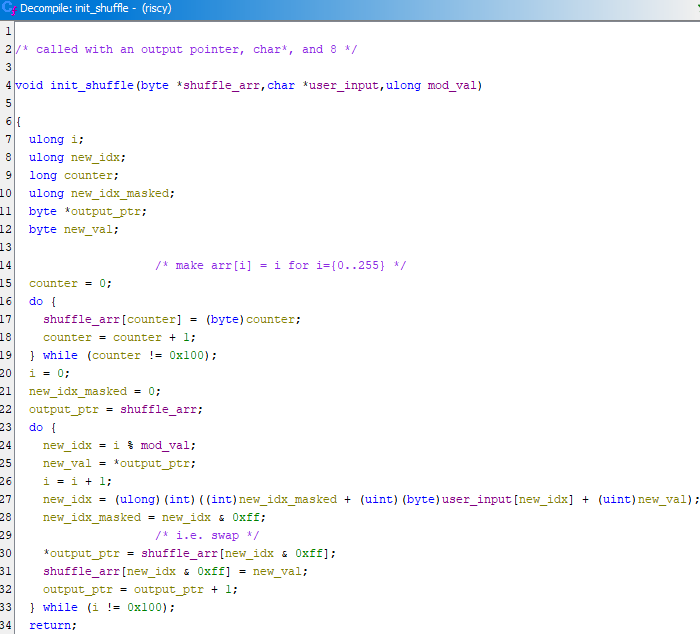
entry- Where the ELF loader startsinit_shuffle- Makes an array of bytes based on the text the user inputs, and another value that’s hardcoded inentry.shuffle_and_fetch- Mutates the array frominit_shuffleand returns a single byte.sys_exit- All this does is invoke the syscall to exit.
Between init_shuffle and shuffle_and_fetch, there’s so much shuffling going on, I couldn’t keep track of it all. At a very high level from the PoV of entry, the user inputs a flag guess, which builds the array from init_shuffle, and then shuffle_and_fetch mutates the array and returns a value. That value is compared against a stored chunk of bytes.
Analysis: init_shuffle

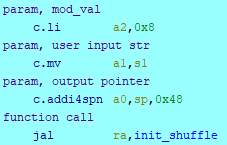
First thing’s first, this function is only called once from entry. When it’s called, there are 3 parameters passed to it, an output pointer on entry’s stack, a pointer to the user’s inputed string, and the value 8.

The function then builds a byte array, then as the name implies, shuffles it around. Notably, the index as it shuffles is affected by the values in the string.
Analysis: shuffle_and_fetch

Despite being shorter, this feels even shufflier. Reasonable variable labels went out the window and I just named them for the registers that hold them. For those wondering where a3 is, it does get used as a scratch register to store the index used on the return line. The basic function of this is to advance through the array and produce shuffled data to be compared with the stored bytes.
Dynamic Analysis
Getting emulation running wasn’t terrible, I mostly followed this guide, which walks you through cross-compiling Linux, and Busybox for RISC-V, and building QEMU to run RISC-V.
Docker
I produced a Dockerfile and a few shell scripts to start all that for me, and soon I could jump into a RISC-V environment very easily. I ran this on an Ubuntu host, I think you would need to do something similar because running this requires the --privileged flag.
Because one of the scripts uses mount, this needs to be run with --privileged, like this:
|
|
Build the disk
The docker image should contain Busybox, built and ready to install. We also want to add our own files, and tweak the OS just a little. I mounted /proc, since that was useful when trying to get maps for dynamic analysis.
Run QEMU
Using the Linux kernel built in the docker build stage, and the drive that was just built, this script will run it all. -s -S allows you to attach gdb to qemu and debug the kernel, but wasn’t used in the end.
Debugging
Using gdb-multiarch, I could attach to QEMU’s gdb stub, which would allow me to debug the kernel. Unfortunately, this did not allow me to debug userspace binaries (unless this is actually just a skill issue because I sure as heck tried). I tried building from source, but abandoned it. I’m still not sure GDB supports RISC-V.
A crude solution
So if I can’t debug it, and I really don’t want to reverse that shuffle algorithm, instead let’s brute force it. I need some way to incrementally validate guesses, and looking over the code, I believe it builds and modifies only successive bytes in the array, i.e. all offsets are positive. This means we can check that a partial solution is partually correct. I could brute force the flag one character at a time. To do this, I patched the binary to emit one of the registers in entry. To reiterate how this program works, a flag is entered by STDIN, which is then used to build an array with init_shuffle, and shuffle_and_fetch runs in a loop to build some ciphertext. One of the last things that happens in entry is a loop that compares the generated ciphertext with the stored ciphertext. Inside that loop is a register with a pointer to the ciphertext that gets incremented as more of the ciphertext is correct. I patched in 6 bytes to invoke sys_exit and use that register as the exit code. Because the entire .text section is only 528 bytes long, and the .rodata section immediately follows it, I had to clobber something. I chose to kill the print syscall that indicates failure.

Now it’s just a matter of brute forcing. Busybox severely limits my options for programming this, I went with sh (a little different from bash as I found out). The script is pretty simple, just try the flag we’ve built so far with a new character, and when the return code increments, we know that’s the correct letter.
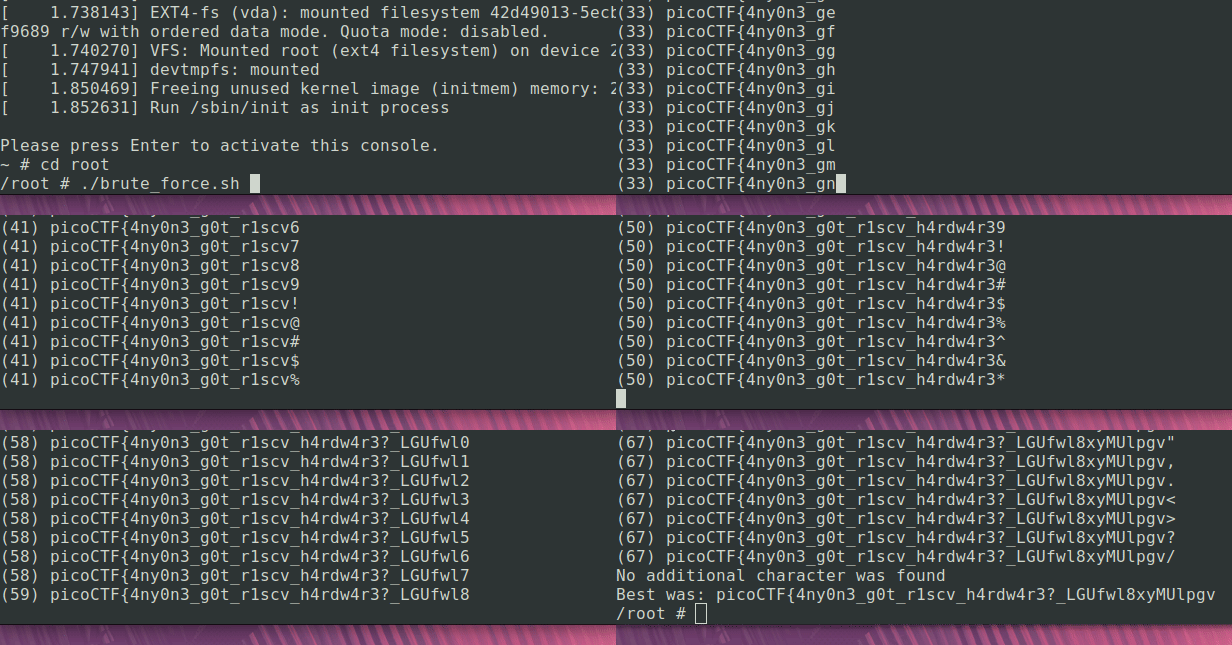
Let’s run it and see what happens, this took about 50s in real time:

picoCTF{4ny0n3_g0t_r1scv_h4rdw4r3?_LGUfwl8xyMUlpgv
Well, that’s (almost) a flag. What happened at the end there, I should see a closing curly brace, right? I’m not 100% sure why, but I vaguely remember from the disassembled code that shuffle_and_fetch affects the current index and the 2 immediately after it, so that would maybe indicate the final 2 bytes are a little different. Let’s look at a few sections of the output that are interesting.
First, one of the characters (the v) incremented the ciphertext pointer twice, then successive guesses were incremented by 1 from the previous guess, as would be expected. Probably a bug in my script or the patch.

Second, we did actually find the next character (the z), but the script didn’t pick up on it because of the first issue.

So if the earlier hypothesis is correct, and we’re just missing 2 chars, then the last char should be a closing curly brace, so let’s send it:

Phew
